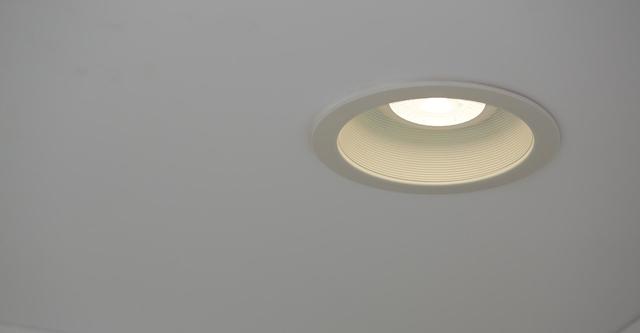
Recessed or canned lights are a popular lighting choice in many homes, and it’s easy to see why. They appeal to all types of décor styles and offer great functionality. But when it’s time to change a burned-out bulb in one of these fixtures, we know it can feel a bit intimidating—especially if you’ve never done it before.
Fear not! With the right tools and a little know-how, changing recessed or can light bulbs is a straightforward task. We’ll walk you through the steps so you can once again turn your lights to full strength and be safe and efficient while doing so.
(Psst: Our Wafer Smart LED Downlight is a great example of wireless recessed lighting. We made an installation video for this light, which might be useful for all the visual learners out there!)
Now, let’s discuss what you’ll need to get the job done.
Tools and Materials
- Replacement light bulb: Make sure it’s compatible with your fixture and matches the wattage and type of the old bulb.
- A ladder or step stool: Grab one that’s sturdy and position it on a level surface.
- A screwdriver: Keep one around should you need to remove the trim or housing.
- A pair of gloves (optional): Have them on hand (pun!) to protect yourself from sharp edges and potential hot bulbs.
- Safety glasses (optional): Shield your eyes from debris.
- A voltage tester (optional): Confirm the power is off before starting.
Safety First
Before you begin, it’s crucial to take a couple more steps.
Turn Off the Power
Go to your circuit breaker box or fuse panel, and locate the switch or circuit that controls the recessed light you’re working on. Switch it off in order to cut power to the fixture.
Wait for the Bulb to Cool
If the bulb has been in use recently, give it some time to cool down to avoid burns.
Wear Safety Gear
Put on your gloves and safety glasses to protect yourself during the process.
Test for Voltage (Optional)
This is an optional step, but if you have a voltage tester, you can use it to double-check that the power is off. Just insert the tester into the socket; if it lights up, the circuit is still live.
Now that you’re equipped with the necessary tools and have taken safety precautions, let’s dive into the step-by-step process of changing a recessed light bulb.
Step 1: Remove the Old Bulb
With the trim out of the way, you can now access the old bulb.
Locate the light within the housing—it may be secured by clips or a twist-lock mechanism.
If there are clips, press them gently to release the bulb. For twist-lock bulbs, turn the bulb counter-clockwise to release it from the socket.
Once your old bulb is loose, carefully remove it from the socket. Be careful—we don’t want to drop it!
Step 2: Install the New Bulb
Now it’s time to replace the old bulb with a new one. (Cue all those jokes about how many people it takes to screw in a light bulb.)
Take your new bulb and align it with the socket.
If it’s a twist-lock bulb, insert it into the socket and turn it clockwise until it locks in place. For other types, simply push the bulb into the socket until it’s securely seated.
Ensure the bulb is snug but don’t overtighten it, as this can damage the socket.
By the way: If you’re still deciding which new bulb you’ll be using, make sure to measure for the best fit. Recessed cans with a diameter of 4” work best with BR30 sizes, and recessed cans with 6” diameters use BR40 sizes.
Step 3: Restore Power and Test
We’re almost done, so let’s turn that power back on!
Return to your circuit breaker box or fuse panel.
Flip the switch or circuit back on to restore power to the recessed light.
Stand back and turn on the light from the wall switch.
Verify that your new bulb is working correctly and that the fixture is turning on as expected.
Step 4: Enjoy!
Just by following these simple steps, you can have your recessed lighting fixtures shining brightly once again.
Changing Recessed Light Bulbs – FAQs
Still need some help? We’ve been there! So here are answers to some of our most frequently asked questions.
Can Recessed Light Bulbs Be Replaced?
Yes, recessed light bulbs can typically be replaced. Recessed lighting fixtures are designed with replaceable bulbs in mind, making it relatively easy to swap out a burnt-out or outdated bulb. (For proof, see above!)
The exact process for replacing a recessed light bulb can vary slightly depending on the type of fixture and bulb used. It’s essential to follow the manufacturer’s instructions and safety guidelines when attempting to replace recessed light bulbs to ensure everything goes well.
How Do You Remove Recessed Lights With Spring Clips?
Removing recessed lights with spring clips is pretty simple. First, turn off the power to the light fixture at the circuit breaker. Then, typically, you can reach up into the recessed fixture and locate the spring clips on either side of the bulb. Gently squeeze these clips together while pulling the bulb downward. This action should release the bulb from its socket. Be careful, and don’t force anything! When inserting the new bulb into the socket, spread the spring clips apart to secure it in place. Finally, restore power to the fixture, and your recessed light should be ready to go once again.
Is Canned Lighting the Same as Recessed Lighting?
Canned lighting and recessed lighting are basically the same thing. Both terms are often used interchangeably to refer to the type of lighting fixtures that are installed directly into the ceiling or wall. Whatever you want to call it, these lighting options provide a sleek, unobtrusive look—you can count us as fans!
Is It Difficult to Change a Recessed Light Bulb?
As you can see in the short list of instructions, it’s not especially hard to change a recessed light bulb. But if you feel uncomfortable with the process at all, you can always consult a professional electrician.
If you do choose to undertake this task yourself, we think you’ll be pleased at what a big difference this DIY task makes. Happy lighting
