How to Install a Smart Thermostat – 5 Easy Steps

Using a smart thermostat is a great way to save money on heating and cooling, to manage your energy use, and to make your smart home even more seamless—and we’re excited to help you enjoy all those amazing benefits.
But first, you have to install your CYNC Smart Thermostat. And prior to installation, there are some steps you need to take to ensure you have the right product for your house. Before opening your smart thermostat, make sure your purchase is compatible with your home’s system and wiring. Many manufacturers offer compatibility tools or checklists online—and it’s always better to be safe than sorry.
Once you’ve confirmed you have the correct smart thermostat for your setup, you can get started. This will be fun! But of course, if you don’t feel comfortable installing this tech yourself, you can always hire an HVAC technician.
Step One: Beginning the Smart Thermostat Installation Process
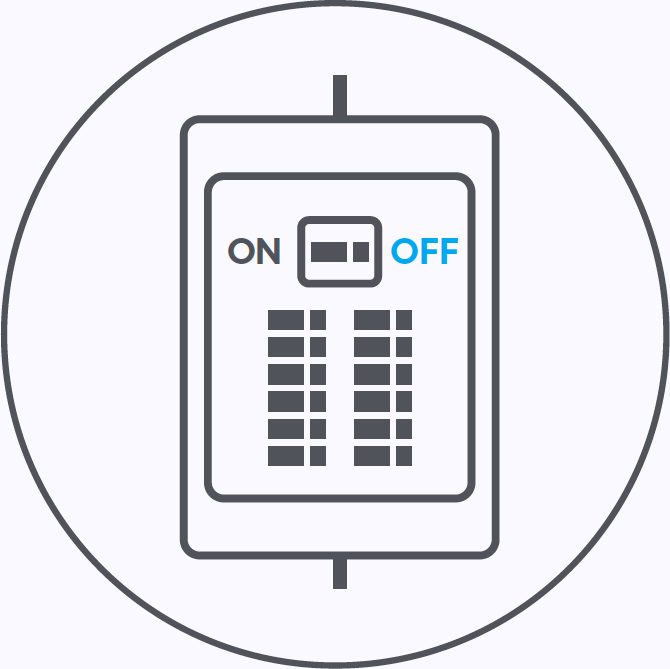
Safety ALWAYS comes first. Before you get too far into the instructions, make sure you’ve turned off your HVAC system at the breaker panel. Even if you’re pretty sure, go ahead and double check—it’s that important! (Tip: An easy way to check is to try adjusting the thermostat temperature.)
Step Two: Choosing the Right Thermostat Location
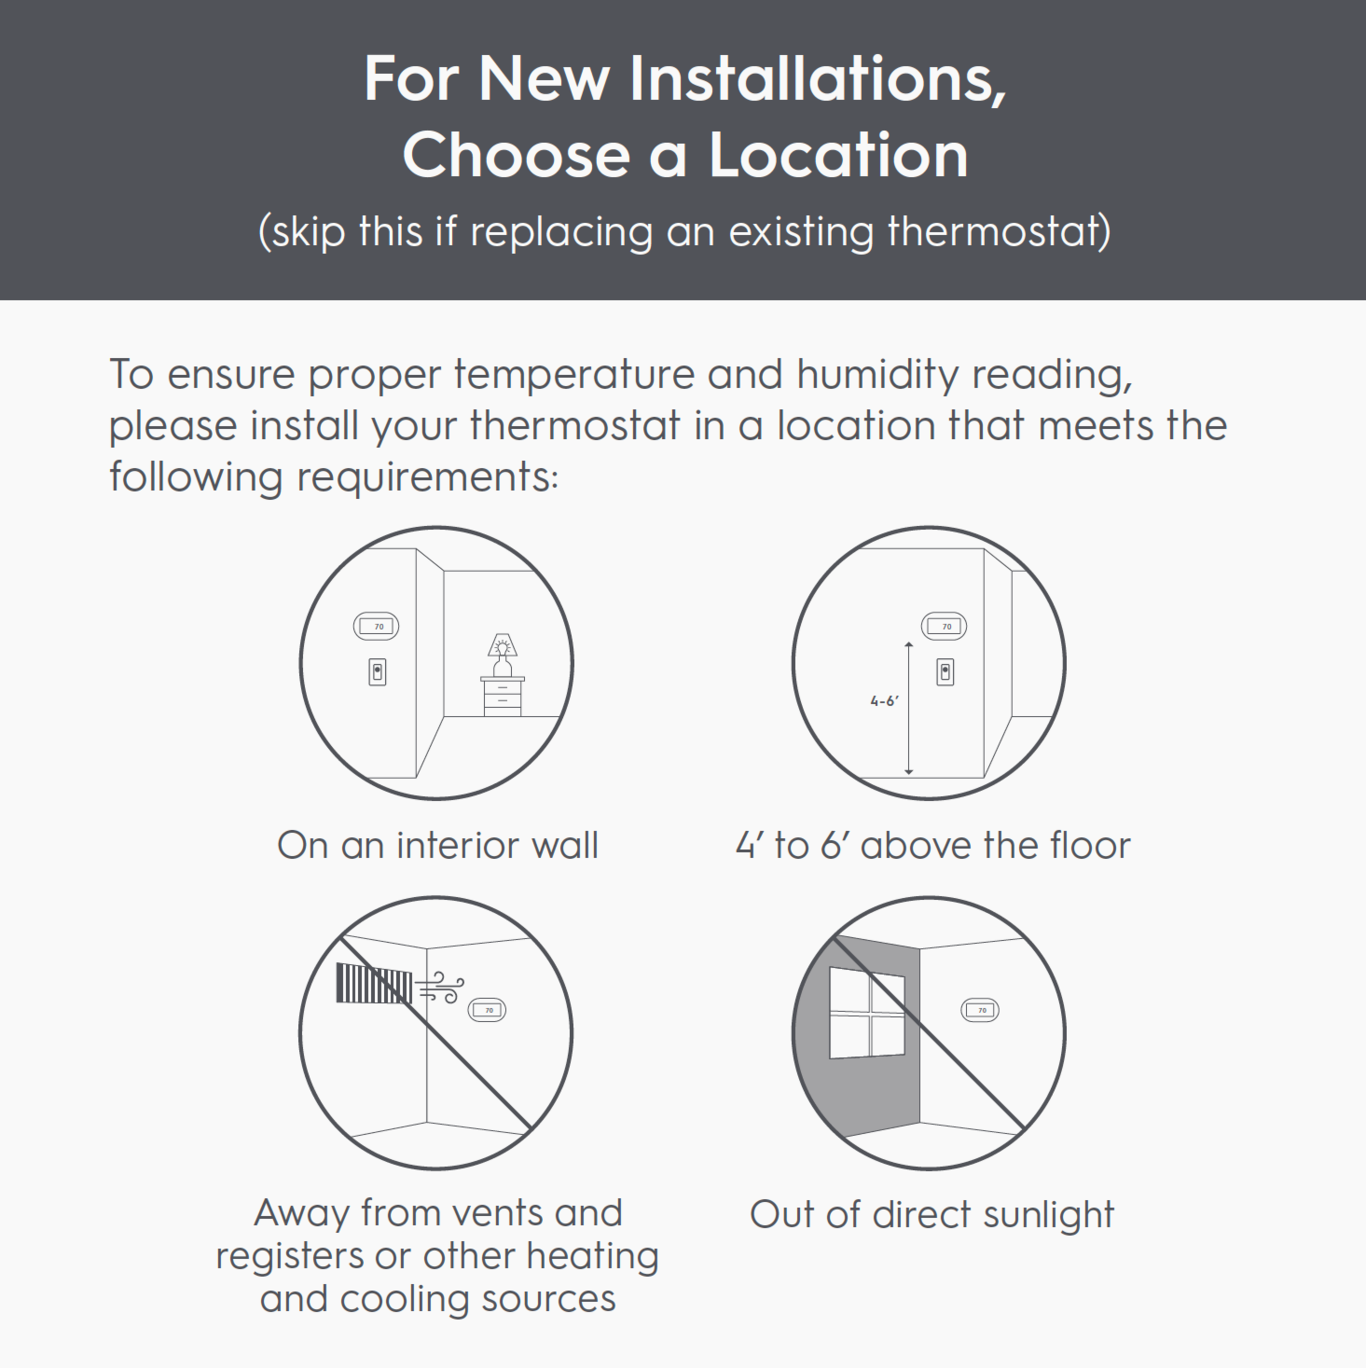
Make sure you choose your ideal placement for your smart thermostat. We recommend areas like interior walls. After all, interior walls are more likely to be out of direct sunlight and away from grills or other heating and cooling sources. (Placing your thermostat too close to those items may render your tech ineffective, or otherwise glitchy.) Ensure that your smart thermostat is about four to six feet above the floor, and out of reach from any curious kids or pets.
We’re about to tell you how to install a smart thermostat step by step. But if you’re more of a visual learner, feel free to check out our video.
Step Three: Removing the Old Thermostat
If you’re replacing a thermostat, we can help you get out with the old and in with the new! First, remove your existing thermostat panel.

If you don’t see screws on the faceplate, it should just pull off. Then, look at the wires attached.
Note: If the old thermostat has 110/120V wires with wire nuts, it is a high voltage system and not compatible with the CYNC Smart Thermostat!
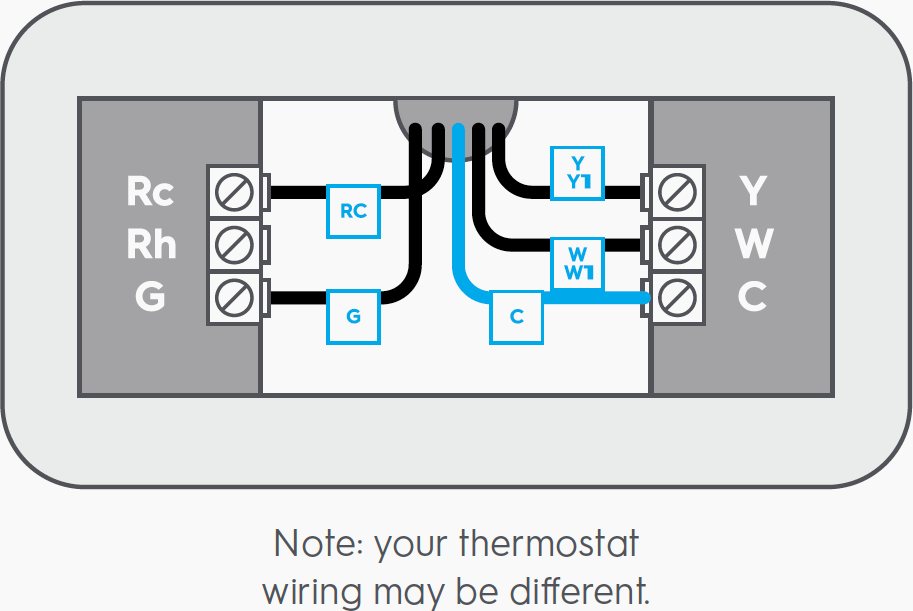
Take a picture of your existing wiring for reference.

Remove any jumper wires (wires that connect to two terminals), like Rh to Rc. Using the wire labels provided, label each wire based on where it’s connected to the thermostat terminal—NOT based on the color of the wire.
Disconnect the wires and unscrew the old thermostat base. Be careful to keep the wires from falling back into the wall. Hold your CYNC Smart Thermostat in its new location. If the old screw holes or an unpainted area is visible, use the provided optional trim plate to cover them up.
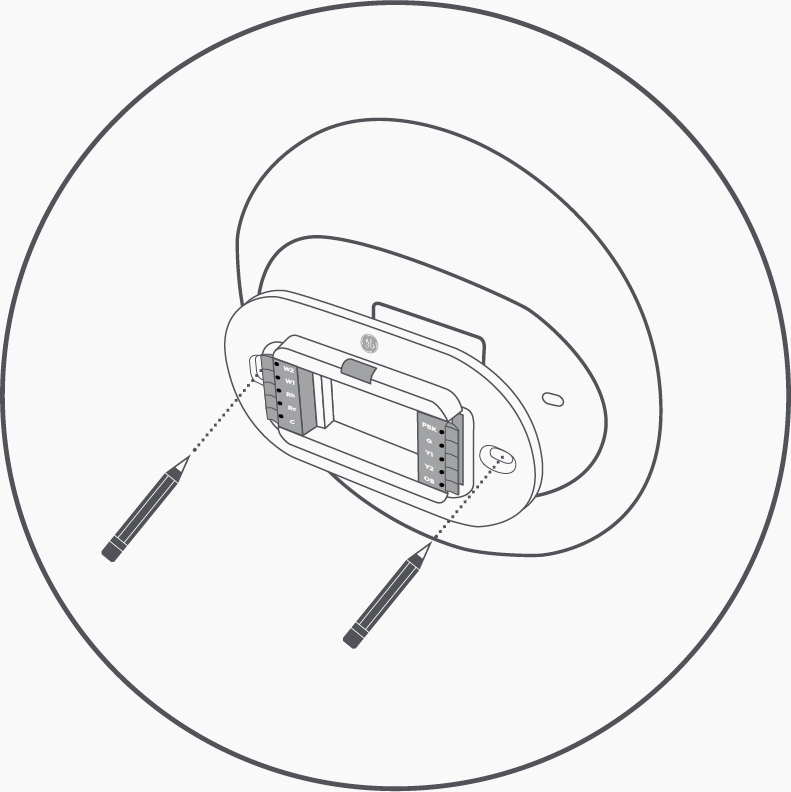
If you ARE using the optional trim plate, place it between the wall and back plate. Use the built-in level on the back plate to ensure the plate is level. Mark both holes with a pencil.
If you ARE NOT using the optional trim plate, place the back plate against the wall. Use the built-in level to ensure the back plate is level. Mark both sides with a pencil.

Now we’ll drill holes and attach the back plate. Before drilling, make sure there are no pipes or wires behind the wall! Drill mounting holes for the drywall anchors using a ¼” drill bit. Insert anchors. Place back plate against the wall and screw in both screws.

If you ARE using the trim plate, place it against the wall with the back plate in front. Screw in both screws.
Step Four: Wiring the Thermostat
Next, we’ll insert the wires into the terminals.
First, press the terminal lever on the side of the base plate.
Then, slide a wire into the terminal.
The lever will stay depressed when the wire is properly inserted in the terminal.
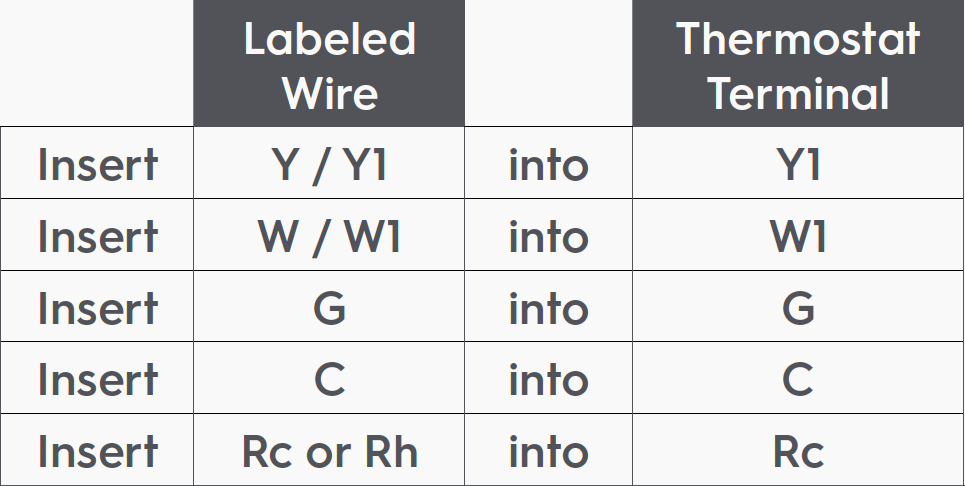
Insert your labeled wires into the appropriate terminals. For heat pumps, insert OB labeled wire into OB thermostat terminal.
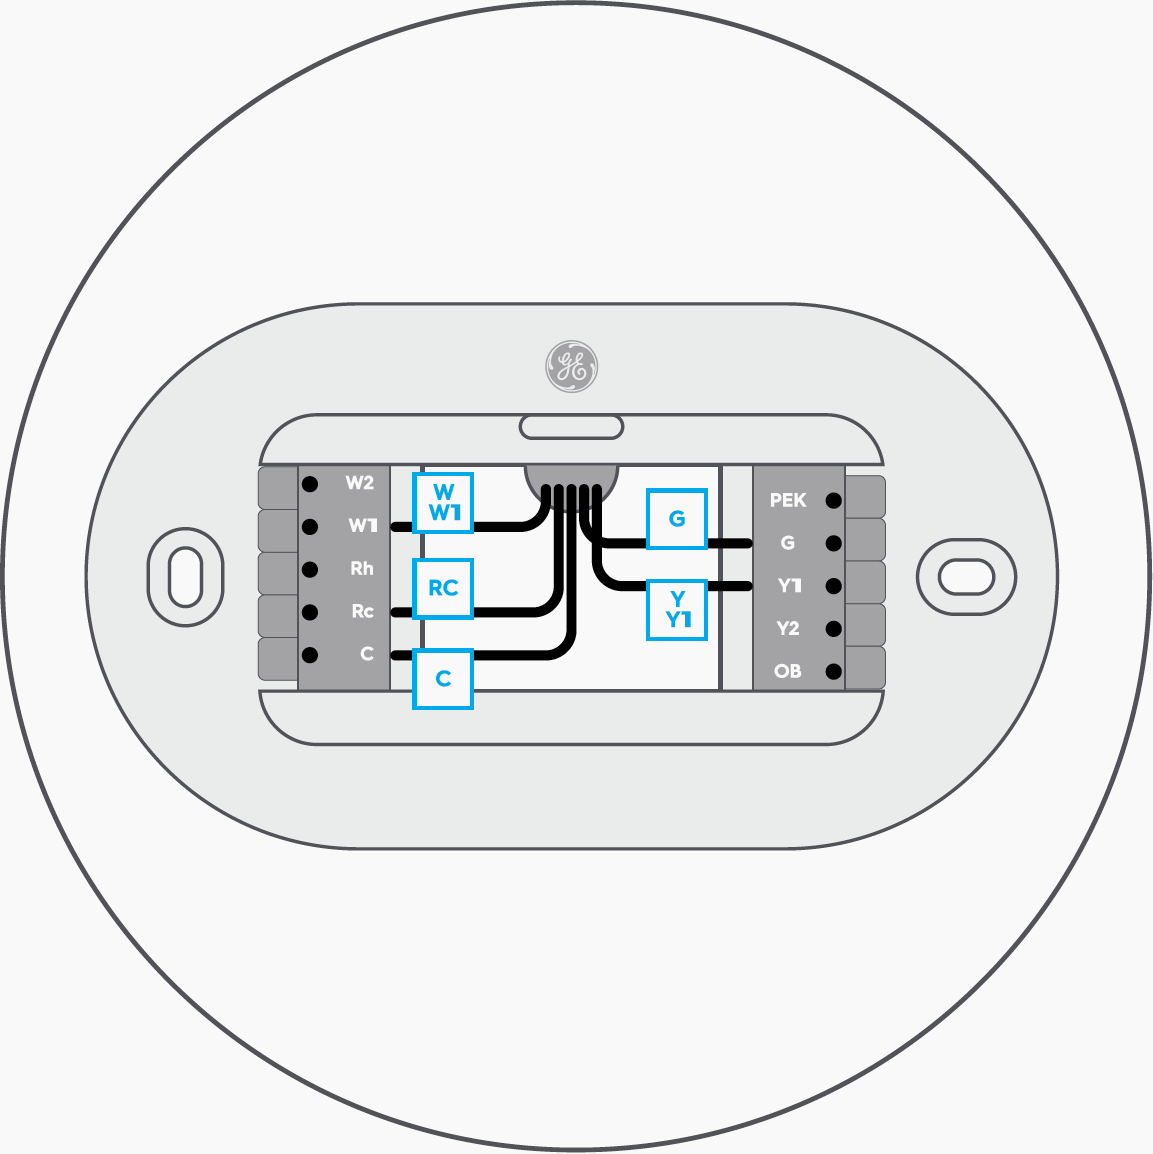
Insert any remaining wires into the corresponding terminals on the back plate. Then push excess wires into the wall.
Now we’ll mount the thermostat onto the back plate. Align your thermostat over the back plate. Orient it so that the thermostat control buttons are on the bottom. Gently push the thermostat into place until it clicks.

Finally, you’ll turn the power back on for your HVAC system at the circuit breaker box.

A Cync Thermostat will automatically power on. Be sure to begin your setup in the CYNC smart home app within 30 minutes of powering on the thermostat. If 30 minutes pass, you can re-enable setup mode by removing the thermostat from the back plate and re-attaching it.
Step Five: Pairing the Thermostat to Wi-Fi and Setting Up With the Cync Smart App
After your smart thermostat is successfully installed and the power is back on, you can connect it to Wi-Fi, to your Cync App, and to other tech, like a thermostat sensor.
This will help you optimize your new device. By connecting to a smart home app, like the Cync App, powered by Savant, you can enjoy from-anywhere control. Plus, you can even schedule temperatures for different times of day. Simply add your new thermostat to your devices in the Cync App, and enjoy seamless control and optimal comfort.
Add a temperature sensor to your setup for even more hands-off housekeeping. Once paired with your smart thermostat, these devices detect changes in a room’s climate and automatically adjust them to ensure you’re always kicking back in your preferred atmosphere.
We hope this process is super seamless for you. But if you have any questions, feel free to reach out to our support team by visiting our Cync Support Customer Service online or by calling 1-844-302-2943. Once you install your smart thermostat, comfier days are ahead!
Related Articles
-
31 May, 2024
Can you cut LED Light Strips?
-
31 May, 2024
LED Lighting Maintenance: How to Extend the Lifespan of Your Lighting Fixtures
-
29 April, 2024
Smart Plug – What Is It & How Does It Work?
-
1 November, 2023
How to Change a Recessed or Canned Light Bulb
-
25 September, 2023
How to Install a 3-Way Light Switch—DIY Guide
-
20 September, 2023
How Do Smart Bulbs Work with Switches (Regular or Smart)?


